Routing Electrical is a great tool for incorporating the electrical aspect into your 3D models however, it can sometimes be a little time consuming. There are several different tools than can make this process a whole lot easier and quicker. Using standard cables and/or the from/to tables we can semi-automate several processes. In this 2-part series we will explain each method in turn.
Standard Cables
If you use standardised cables, if they are bought in or even made inhouse they generally have a fixed length. Using standard cables in Routing Electrical, you can set these cables up for use time and time again. This means there is no longer a need to go looking for those connectors that you can never find or even trying to remember the cable that is used for this configuration.
So how does it work? Well, there are two methods that can be used here, you can either configure your cable directly from within the Standard Cables command. Or for those of you who insist on using excel for everything you can even do it that way.
Method 1 – Within SOLIDWORKS
Step 1:
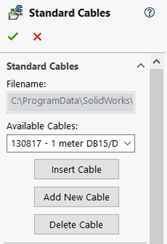
From the Standard Cables property manager, you get the options as seen below. You can either select a pre-existing cable to insert into your design, or you have the option ‘Add New Cable’ where you can configure a new cable to your specification. This new cable will be automatically added to your library for future use.
Step 2:
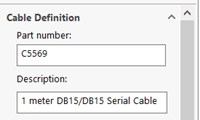
When creating a new cable, we first get the option to assign a part number for the cable. The part number will be what is displayed as the route name in your feature tree. We also get the option to add a description, it is this description that will be displayed in the available cables drop-down seen in the previous image.
Step 3:
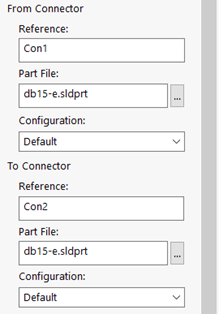
Next up is specifying the connectors that will be used for this cable. The connectors can be given a reference which will be used while inserting the cable into your design. We can then assign the part file for the connector. As you can see from the image below, we can specify the ‘From Connector’ and the ‘To Connector’. Finally, we can specify what configuration of the part file you want to use. This way if you have a connector configured with different numbers of pins then we can select the appropriate on for this cable configuration.
Step 4:
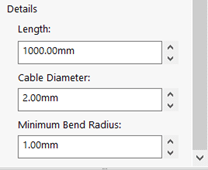
The final stage to configuring your cable is defining the details of the cable itself. For this we can define the cable length, diameter, and minimum bend radius. Once you have done this all that is left to do is hit the green tick and your cable has now been added to your library and is ready to be inserted into your design.
Method 2 – Using Excel
As previously mentioned, Microsoft Excel can also be used to setup the Standard Cables that you require. To access the Standard Cables excel file, you can find the file location specified in the Routing Library Manager. The default location for this is -C:\ProgramData\SOLIDWORKS\SOLIDWORKS 2021\design library\routing.
In this file you will notice that the Header row number is specified. This is where the application starts to read the information from the file to create the Standard Cables. All cables are then listed underneath with no blank rows in between. If a blank row is present, the application will stop reading at this point and any further cables will not be selectable in the application.

Along with all the cables listed in the excel file, you will also see that all the properties that were defined in the previous method have their own column. This means that we can simply define all the properties in excel, then once we are finished simply save the file and the new cables will be visible when using the Standard Cables command.
Please note the information mentioned at the top of the excel document to ensure you enter the properties correctly.
In part 2 of this series, we will look at the use of From/To tables and how we can leverage them to speed up out electrical incorporation into our 3D models.