AUTODESK

Revit Room Boundaries

Apr 5, 2021 | Autodesk

Rooms are powerful objects and an essential part of Revit for scheduling information.  It’s important to make sure they are placed correctly and although they are placed in plan view, they are a 3D element enclosing the entire volume that they are allocated to. Rooms automatically pick up bounding elements such as walls, floors and ceilings - and you can use the Highlight Boundaries tool as an aid before placement.

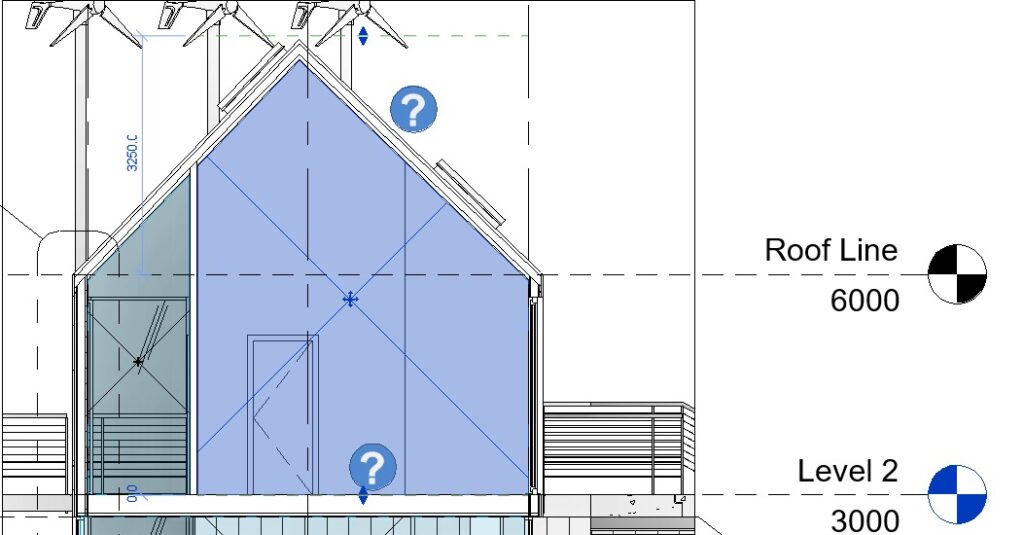
However, you should also be aware of how they associate to levels and how you can utilise the Limit Offset property. When there is no physical element for the Room to be bound by then we can associate it with the Level above, but this can often lead to areas of the building being missed resulting in inaccurate volume calculations – such as the case below where the room volume should include the space up to the underside of the roof but instead incorrectly stops at the Roof Line Level.
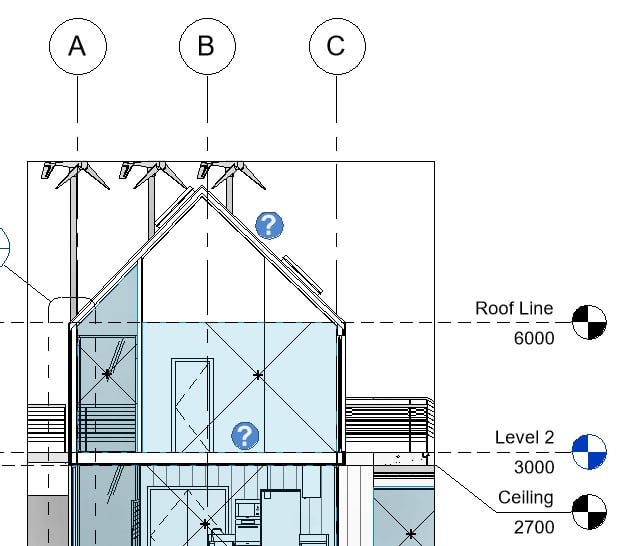
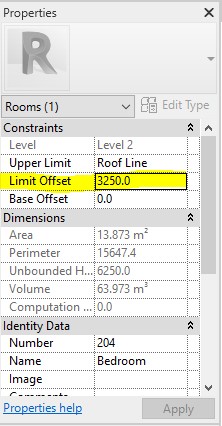
By setting the room’s Limit Offset we can force it to go above the level it is associated to and therefore include the empty roof space – this is also important when relating to the Space tool for MEP calculations. 
Note that Revit now defaults to using the underside of the roof as a bounding element and will report the room volume correctly.

Useful Note – Walls, floors, roofs, ceilings, architectural columns and  curtain systems all have an instance property built in to make them ‘Room Bounding’ this is a tick box which can be switched on or off as necessary.

We hope you enjoy these tips!

Related Articles

AutoCAD Dimension Editing Guide

AutoCAD Dimension Editing Guide

Dimensions are one of the most important elements in any technical drawing. They communicate design intent, manufacturing requirements and construction information, so accuracy is essential.  Once dimensions have been placed, there are several...

AutoCAD Dimension Settings Guide

AutoCAD Dimension Settings Guide

Dimensions are fundamental to every AutoCAD drawing. Whether you're producing architectural plans, fabrication drawings or engineering details, accurate and consistent dimensions ensure everyone working from your drawings has the information they need.   AutoCAD...

10 More AutoCAD Customisation to Improve Productivity

10 More AutoCAD Customisation to Improve Productivity

If you read our first blog covering AutoCAD customisation tips, you'll already know that a few simple changes can make a big difference to your day-to-day workflow. From personalising the Quick Access Toolbar to streamlining keyboard shortcuts, small adjustments soon...