When working in AutoCAD, there are often several ways to achieve the same result. While the ARRAY command is useful for creating repeated objects, you can also use AutoCAD grips to make multiple copies without opening the full array tools.
This can be particularly handy when you need to quickly duplicate objects in a straight line or arrange them around a central point.
With a few simple grip options and keyboard shortcuts, you can create evenly spaced copies, rotate objects around a central point and speed up every day drawing tasks.
What Are AutoCAD Grips?
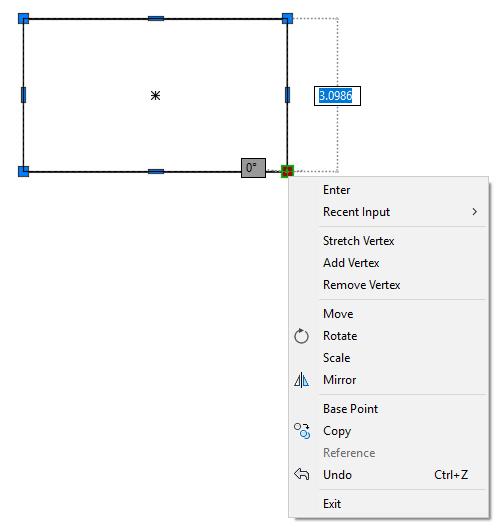
Grips are the small squares that appear when you select an object in AutoCAD. They allow you to make changes directly to your drawing without having to start a separate command.
Depending on the object selected, you can use grips to:
- Move or stretch objects
- Rotate objects around a point
- Scale objects
- Create copies of existing objects
By default, selecting a grip activates the Stretch option. However, you can cycle through other editing options by pressing Enter or access them through the Command Line.
These options can also be used to create repeated copies of objects, providing an alternative to the standard ARRAY command.
How to Create a Linear Array Using AutoCAD Grips
A linear array arranges multiple copies of an object in a straight line. For example, you might want to position several chairs along a table or repeat a component at regular intervals. Rather than using the ARRAY command, you can achieve a similar result using grips.
Step 1: Select Your Object
Start by selecting the object or block you want to copy.
You'll notice grips appear at different points on the object. If you're working with a block, select its insertion point grip to activate it.
Step 2: Activate the Copy Option
Once the grip is active, AutoCAD defaults to the Stretch option.
Type C into the Command Line to switch to Copy or select Copy from the available grip editing options.
Step 3: Set the Spacing
Turn on Ortho Mode (F8) to keep your copies aligned horizontally or vertically.
Move your cursor in the direction you want to copy the object and enter a distance, such as 1000 units.
This creates your first copy at the specified distance.
Step 4: Create Additional Copies
Here's where a useful keyboard shortcut comes in.
Press and release Ctrl while using the multiple-copy grip option to apply the previous spacing as an increment.
You can then continue placing additional copies at the same interval without entering the distance each time.
This is particularly useful when you need a quick row of evenly spaced objects without creating an associative array.
How to Create a Circular Array Using AutoCAD Grips
You can also use grip editing to arrange objects around a central point. For example, imagine you have a circular table and want to position eight chairs evenly around it.
Step 1: Select the Object
Select the chair block and activate its insertion point grip.
Step 2: Change the Base Point
Type B into the Command Line to activate the Base Point option.
Using the Centre Object Snap, select the centre of your circular table.
This tells AutoCAD which point to use when rotating the object.
Step 3: Switch to Rotate
Press Enter to cycle through the available grip editing options until you reach Rotate.
Next, type C to activate the Copy option. This allows you to create rotated copies while keeping the original object in place.
Step 4: Enter the Rotation Angle
To position eight chairs evenly around a full circle, divide 360 degrees by eight.
360 ÷ 8 = 45 degrees
Enter 45 as your rotation angle to create the next chair.
Step 5: Repeat the Rotation
Press and release Ctrl to use the previous rotation angle as an increment.
Continue placing copies until all eight chairs are positioned around the table.
This gives you an evenly spaced circular arrangement without needing to use the POLAR ARRAY command.
Grip Editing vs the ARRAY Command: What's the Difference?
Although both methods allow you to create repeated objects, there are some important differences.
The standard ARRAY command creates an array object that can be edited after placement. You can adjust the number of items, spacing and other properties without having to reposition each object individually.
Grip copying, on the other hand, creates separate objects. This makes grip editing a useful option for quick arrangements where you don't need the additional controls of an associative array.
For more complex layouts, or where you expect to make changes later, the ARRAY command will generally be the better choice.
Make More Use of AutoCAD Grip Editing
Grips are easy to overlook, particularly if you're used to working primarily with commands.
However, taking a little time to explore the different grip editing options can help you find quicker ways to complete everyday drawing tasks.
A few useful points to remember:
- Press Enter to cycle through grip editing options.
- Use the Command Line to select options such as Copy, Rotate and Base Point.
- Try the Ctrl key when creating multiple copies to repeat spacing or rotation increments.
- Use Dynamic Input to access available grip options directly beside your cursor.
- Not every object has the same grip editing options, so it's worth experimenting with different object types to see what's available.
Get More from AutoCAD with TMS CADCentre
Learning how to use AutoCAD's built-in tools and shortcuts can make a real difference to your day-to-day productivity.
At TMS CADCentre, we offer Autodesk-approved AutoCAD training to help both new and experienced users build their confidence and develop their skills.
Whether you're looking to learn the fundamentals or improve the way your team works with AutoCAD, our team can help you find the right training.
Explore our AutoCAD training courses or get in touch with TMS CADCentre to discuss your requirements.